Help
ACom can be learned in one sitting. This page walks through the app in the order you meet it — from the first launch to the last setting.
Everything described here belongs before you set off, or at the roadside. Traffic data is not real-time, route information can be inaccurate, incomplete or unsuitable, and location accuracy is not guaranteed. The drive remains your responsibility.
The first run
Three things happen the first time you open the app, each of them once:
- The safety notice. A dialog reminds you not to operate the app while driving. It appears exactly once per installation. You can read it again any time under Settings → Safety.
- The advertising consent form. In the EU and some other regions, a Google dialog asks whether ads may be personalised. On iPhone and iPad, Apple's own tracking question comes first. You may decline both; the app then works unchanged and shows non-personalised ads. See Advertising and consent.
- The import. If version 9 was on the device, ACom takes over your saved maps and settings automatically. See Coming from version 9.
Location permission is not requested at launch. It is asked for the first time you tap Position. Notification permission works the same way: it is requested when the first message arrives, not before.
The map at a glance
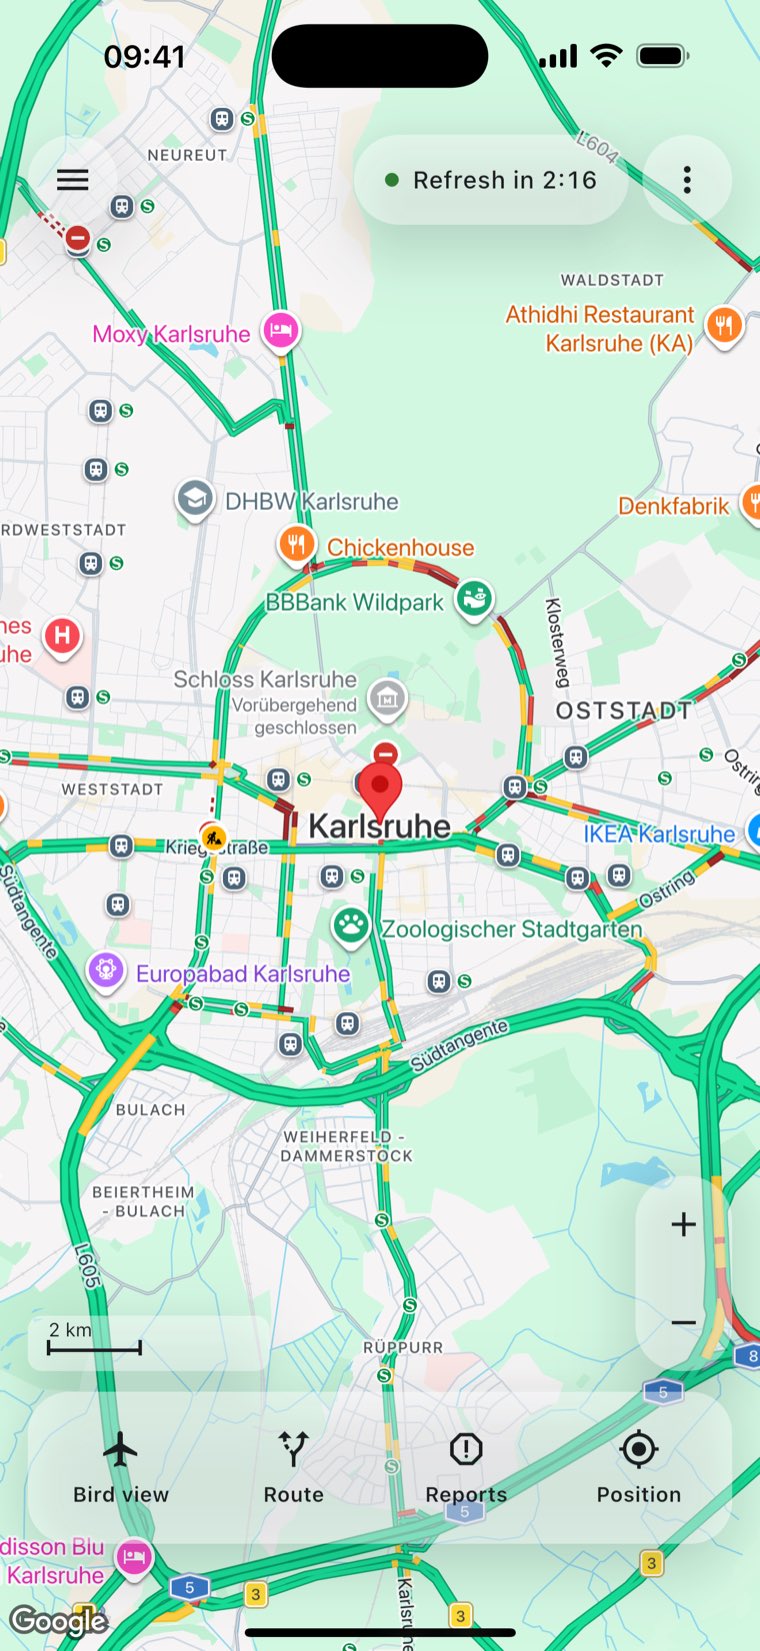
The main map is the app. There is no home screen in front of it — what you see is map, and everything else floats above it.
The bar along the top
- ☰ — navigation menu
- Opens the drawer: Master Map, Traffic news, the map layers and the web links.
- The status pill in the middle
- Reads Refresh in 2:14 — the time until the traffic picture is redrawn. During the reload it says Refresh, and with no connection Offline. The dot in front is green when the app is online, red when it is not.
- ⋮ — more
- The map's own menu: My Maps, Save map, Define area, Search Places, Map style, Navigate, Share this map, Night mode and Settings.
The four buttons at the bottom
The bar along the bottom edge has four equally sized tiles with an icon and a word — big enough to hit without looking. In landscape the same four fold into a 2×2 block in the corner, in the same order.
| Button | What it does | Lit when… |
|---|---|---|
| Position | Follows your location — the map moves with you. | …following is active. |
| Bird view | Turns the map into the direction of travel and tilts it. | …bird view is running. |
| Route | Checks driving time and traffic between start and destination. | …a checked route is drawn on the map. |
| Reports | Shows the TomTom incidents as markers. | …the incident layer is visible. |
Beside them sit the zoom buttons and the scale bar. The scale bar uses whichever unit is set under Settings → Units.
A tap anywhere on the open map reloads the traffic picture immediately and resets the countdown. No menu needed — which is why there is no separate refresh button.
Setting your area
Almost everything in ACom refers to an area: the part of the map you care about. It decides which incidents you see and what is on screen the next time you open the app. Three routes lead there, all through ⋮:
Search places
⋮ → Search Places. Type a town, an address or coordinates. The app suggests addresses as you type, or you can submit what you typed and let it search.
The place found becomes the destination and the map jumps to it. If Position is currently following, the app frames the view so that both are visible — your location and the place you searched for — because that is the question a place search really asks: where is this, relative to me?
The name sticks: choose Save map afterwards and it is already offered as the name.
An area from a route
⋮ → Define area. Enter From and To — two addresses. ACom puts the start marker on one, the destination marker on the other, and frames the view so both fit. This is the way to set up a commute: done once, loaded from then on.
By hand
You can also simply pan and zoom. The visible view is the area — incidents are always fetched for what is on screen. When it looks right, save it with ⋮ → Save map.
Traffic on the map
Two different things on the map could both be called "traffic". They come from different sources and do different jobs:
| Traffic flow | Incidents | |
|---|---|---|
| Looks like | Coloured lines along the roads | Individual markers with a symbol |
| Comes from | Google Maps | TomTom |
| Tells you | How freely traffic is moving | What is going on: jam, roadworks, closure |
| Updates | Automatically, every three minutes | When you ask for it |
| Switch | Settings → Traffic | Reports at the bottom |
The traffic flow runs by itself. Every three minutes the app redraws it; the countdown says when. A tap on the map fetches it at once.
Incidents are only fetched on request — with the Reports button, with the refresh button in the list, or when you open the list over an area nothing has been fetched for. That is deliberate: every fetch costs money, and something that costs money should follow an action, not a glance.
At least 30 seconds pass between two incident fetches. That is not a fault, it is the brake against accidental hammering. Wait a moment and tap again.
Tap an incident marker and the incident opens with the road, the kind of disruption, its length and its age. From there, Open in browser leads to a map view of the incident on the web.
The incident list
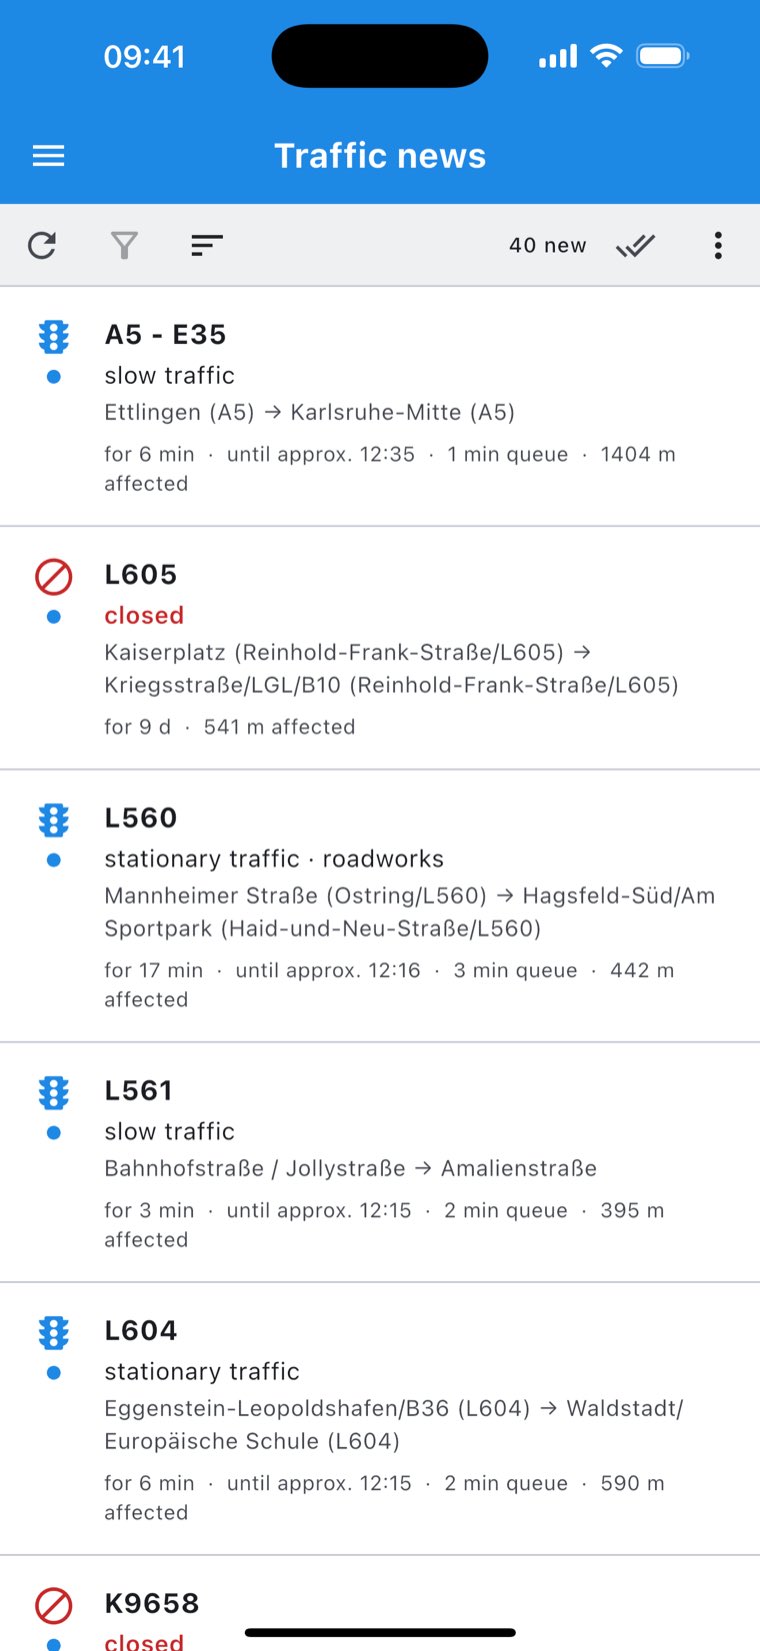
☰ → Traffic news shows the same incidents as a list. Each row names the road, the disruption and, as far as TomTom supplies it:
- for 40 min — how long the incident has been standing
- until approx. 17:30 — when it is expected to clear
- 12 min delay — the delay to expect
- 2400 m affected — the length of the queue
- closed — no way through
The buttons above the list:
- Refresh
- Fetches incidents for the current map view. Pulling the list down does the same.
- Sort
- Newest first, oldest first, by road (A–Z), major roads first, longest queue first, or unread first.
- Filter
- Hides what does not concern you — see below.
- Mark all as read
- Clears the "new" markers. Read incidents do not disappear, they are simply no longer highlighted.
The list only shows incidents inside the map view. Once you have panned the map, the old incidents are not merely stale — they belong to a different place. So the list shows nothing rather than something wrong. Tap ⟳.
Filtering and sorting
Someone driving the same motorway every day does not want to read every incident in the region. The filter under Filter → Set filter builds the condition without asking you to type any operators:
- Words inside one card are joined with AND — all of them must appear in the incident.
- Several cards are joined with OR — any one of them is enough. Add OR condition adds another card.
At the bottom, the result is always visible: the finished condition in plain words, plus how many of the loaded incidents it would let through. That is the most important part of the page — a filter that accidentally hides everything looks exactly like a quiet stretch of road.
Example. Only incidents on the A5:
- Card 1:
A5
Or: the A5 or the A8, in each case only towards Karlsruhe:
- Card 1:
A5andKarlsruhe - Card 2:
A8andKarlsruhe
Filter on switches the finished filter on and off without deleting it.
Checking a route
Route answers the question you have before leaving: will I get through, and is there a better way?
The answer is a few lines:
- The driving time and the distance.
- How much of it is traffic — or "no delay".
- What is in the way: slow traffic, roadworks, a closure, each with the speed at that point.
- Whether an alternative exists and what it saves.
If there is an alternative, the Which way? dialog lets you pick between the original and the fastest route and then tap Navigate this way. ACom hands Google Maps a point on the chosen route — Google plans the details itself and may decide differently.
When the route check refuses
- "No destination set."
- Search for a place, or load a map that contains a destination.
- "No starting point."
- Tap Position at the bottom — your location then becomes the start — or load a map with a start marker.
- "More than 1000 km apart."
- ACom will not check that far. It is a deliberate limit: a long-distance drive is not a commute, and the request would be paid for without answering anything useful.
- "Just checked."
- As with incidents, a short cooldown sits between two checks.
- "You are far from this route."
- The checked route belongs to a saved map but you are somewhere else. Navigation then heads straight for the destination rather than steering you through a point in the wrong direction.
Position and bird view
Position
Position makes the map follow your location. The first time, the system asks for location permission; without it the button has no effect, and ACom says so.
If location services are switched off device-wide, you get "Location is switched off" — that switch lives in the system settings, not in the app.
Bird view
Bird view is the driving view: the map tilts, turns into the direction of travel, and your position sits in the lower third of the screen so there is more map ahead of you than behind.
Three things it solves in the background, noticeable only when they are missing:
- At a red light. A stationary vehicle produces no GPS heading. ACom then uses the compass — otherwise the map would spin at random while you wait.
- GPS jumps. Sixty metres in one second is not speed. ACom believes a speed only when the sensor value and the distance travelled agree.
- Slow is not stopped. Walking pulls the map along too — just more gently, so a metre of measurement noise does not make it twitch.
My maps
⋮ → My Maps. A list with no fixed ceiling: one map per route you drive regularly.
- Save
- ⋮ → Save map. Saved are the view, the zoom, the start and destination markers and the name. If the name already exists, ACom asks whether to overwrite or keep both.
- Load
- Tap the row. The map jumps to the saved view.
- Rename, duplicate, delete
- Through the menu at the end of each row. After deleting, Undo appears briefly.
- Order
- Move up / Move down — the map you use most belongs at the top.
- Search
- The search field filters the list by name.
- Paste map from link
- If somebody sent you an ACom map and the link is on the clipboard, this entry brings it in.
Navigating and sharing
Starting navigation
⋮ → Navigate (Google Maps) hands the current map's destination to Google Maps. On Android, Navigate (Waze) sits next to it; if Waze is not installed, ACom offers to install it.
With no destination marker set, ACom uses the centre of the current view. With nothing at all, it says so rather than starting an arbitrary navigation.
Sharing a map
⋮ → Share this map composes a message with two links:
- A Google Maps link. Anyone can open it, on any device, with or without ACom — it shows the route or the place in the recipient's own map app.
- An
acom://link. Anyone who has ACom gets the complete map through it: name, area, zoom and both markers. Everyone else simply ignores it.
Share position does the same with your current location.
Layers and web links
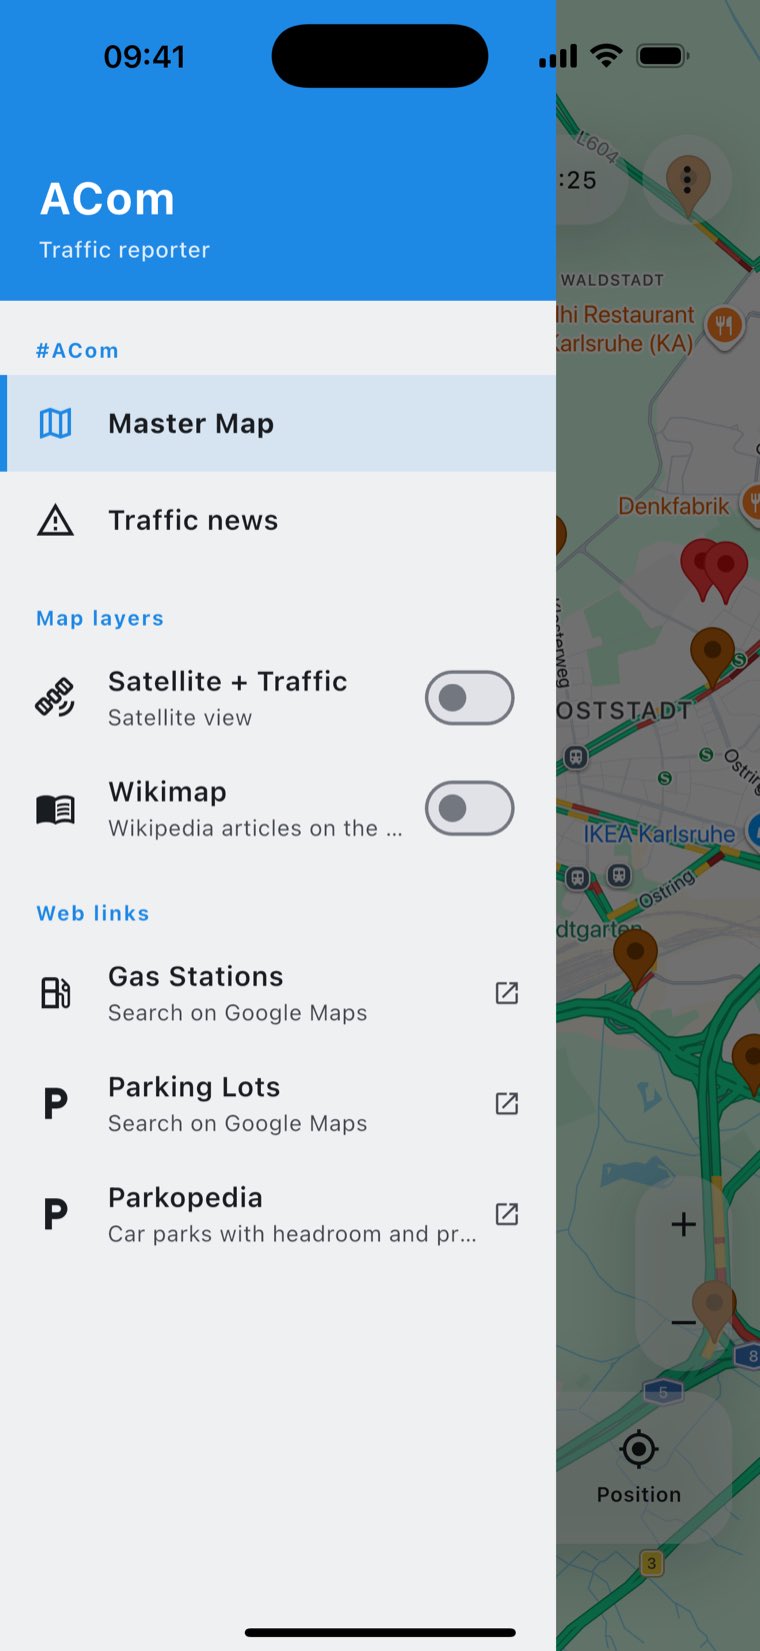
The navigation drawer (☰) holds two extra layers:
- Satellite + traffic
- Switches the map to satellite imagery; the traffic flow stays on top of it.
- Wikimap
- Puts Wikipedia articles about nearby places on the map, in your device language.
Below them, three jumps to the outside world:
- Gas Stations / Parking Lots
- Searches Google Maps around the current map view.
- Parkopedia
- Car parks with headroom, tariffs and opening hours — figures nobody else publishes. Parkopedia searches by town name, not by coordinates, so ACom first works out what the place under the map is called, copies it to the clipboard and opens the site. Paste it into the search field at the top.
Map style and night mode
⋮ → Map style shows ten styles in a live preview — from standard through subdued to high-contrast. Road width controls how boldly the roads are drawn; on a small screen in a car that is the difference between legible and not.
Night mode in the ⋮ menu switches the app and the map to dark. The switch sits in the menu itself so you can see the result while you flip it.
Every setting
⋮ → Settings.
Map
- Traffic
- Google's coloured traffic lines. Turn off if only the incidents interest you.
- Show start/destination markers
- Hides the two markers without deleting them. For maps that are only about the area.
- Blinking position marker
- Makes your own location pulse so it stands out among the map detail.
- Night mode
- The same switch as in the menu.
- Units
- Metric (km) or imperial (miles). Affects the scale bar, route lengths and incident figures.
Device
- Keep screen on
- Stops the display from sleeping while the map is visible. Sensible in a mount, a battery drain otherwise.
- Save battery (network location)
- Derives the position from Wi-Fi and cell towers instead of GPS. Noticeably cheaper and noticeably less accurate — enough for "which town am I in", not enough for bird view.
Safety
- Warning
- Shows the safety notice from the first run again.
Advertising and consent
ACom is free and funded by advertising. A full-screen ad appears from time to time; the map itself stays clear.
In the EU, the EEA, Switzerland and the United Kingdom, the app shows a consent form from Google before the first ad (the UMP form). There you decide whether ads may be personalised using device identifiers.
Until that decision is made, the advertising SDK is not initialised. No advertising identifier is collected before you answer.
- Accept — ads follow your interests.
- Decline — you still see ads, but non-personalised ones. They may take a little longer to load. Nothing else in the app changes; no feature depends on your consent.
On iPhone and iPad, Apple's own question ("Allow app to track?") comes first, because Apple treats it as the prior decision. A "no" there is effective regardless of what you choose in the Google form afterwards.
You can withdraw or change your decision at any time: ⋮ → Settings → Privacy → Privacy options. That opens the same form you saw on first launch.
The entry only appears where the consent form applies — the EU, the EEA, Switzerland and the United Kingdom. Elsewhere there is nothing to change, and a button that opens nothing would mislead more than no button at all.
Coming from version 9
ACom 10 is a complete rewrite, but it ships as an update to the same app. On first launch it takes over your data from version 9 — maps, start and destination points, settings. The old data is left untouched.
What visibly changes:
| Version 9 | Version 10 |
|---|---|
| 16 fixed save slots | A list with no ceiling, in the same order. Nothing is lost. |
| Five "plugins", each with its own map in a web view | Two switches on the real map: Satellite + traffic and Wikimap. The TomTom incidents are now markers on the main map plus a list of their own. |
| Title bar with a countdown | The bar is gone; the countdown floats over the map — 56 pixels more map. |
| Setting "refresh at most every … minutes" | Gone. Incidents are fetched when you ask for them, not otherwise. |
| Plugin manager, GitHub import | Gone. |
If this message appears, nothing is lost: your v9 data sits untouched on the device. Try again restarts the import. If it keeps failing, please get in touch through the support page — with your device model and Android or iOS version.
Something missing, or something not working? Support and frequently asked questions.